“Users” page
Administrators with the appropriate permissions can manage and/or view Users on the system on the "Users" page.
- If the User has a Role that excludes permissions "View Users" and "Manage Users", the "Users" page will not be available to them.
- If the User has a Role that includes only the "View Users" permission, they will be able to access the "Users" page but will not be able to create a new User or edit existing entities.
Description of the entity on the platform in the section: "Users”.
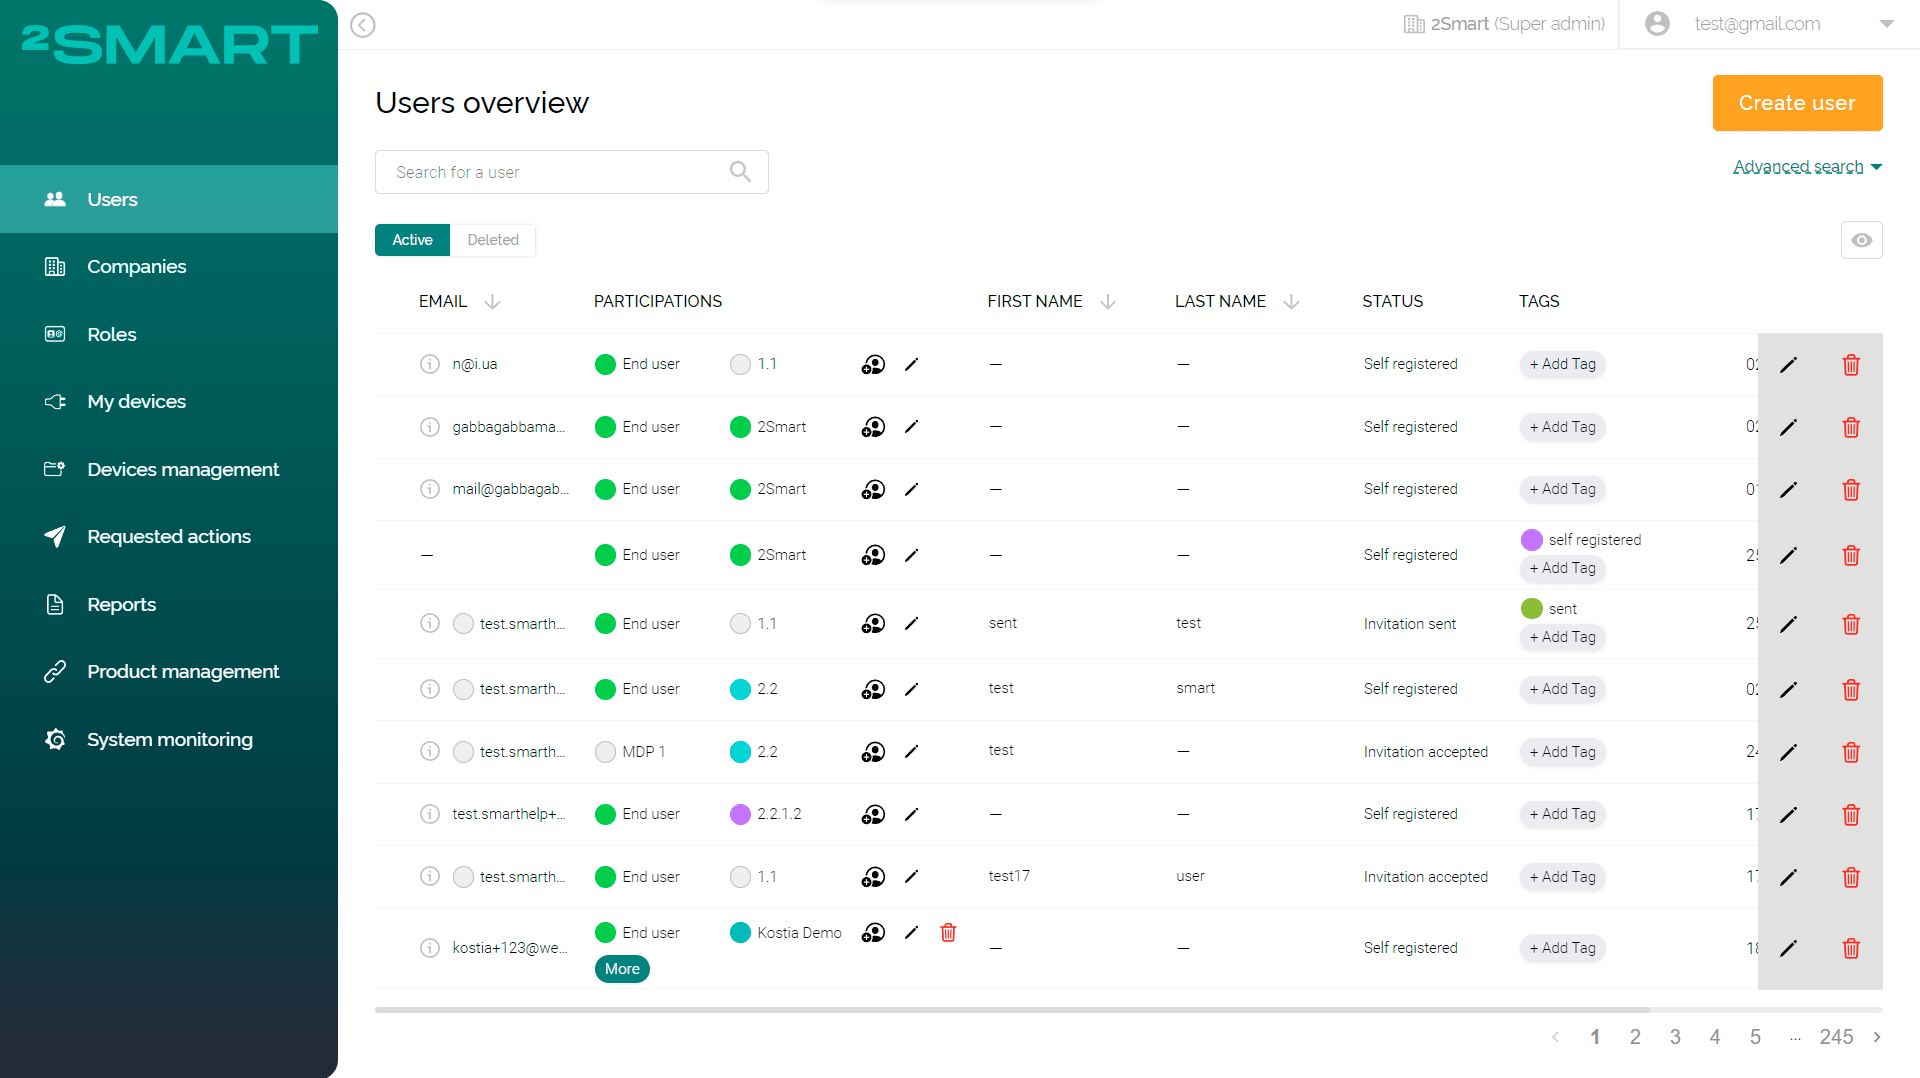
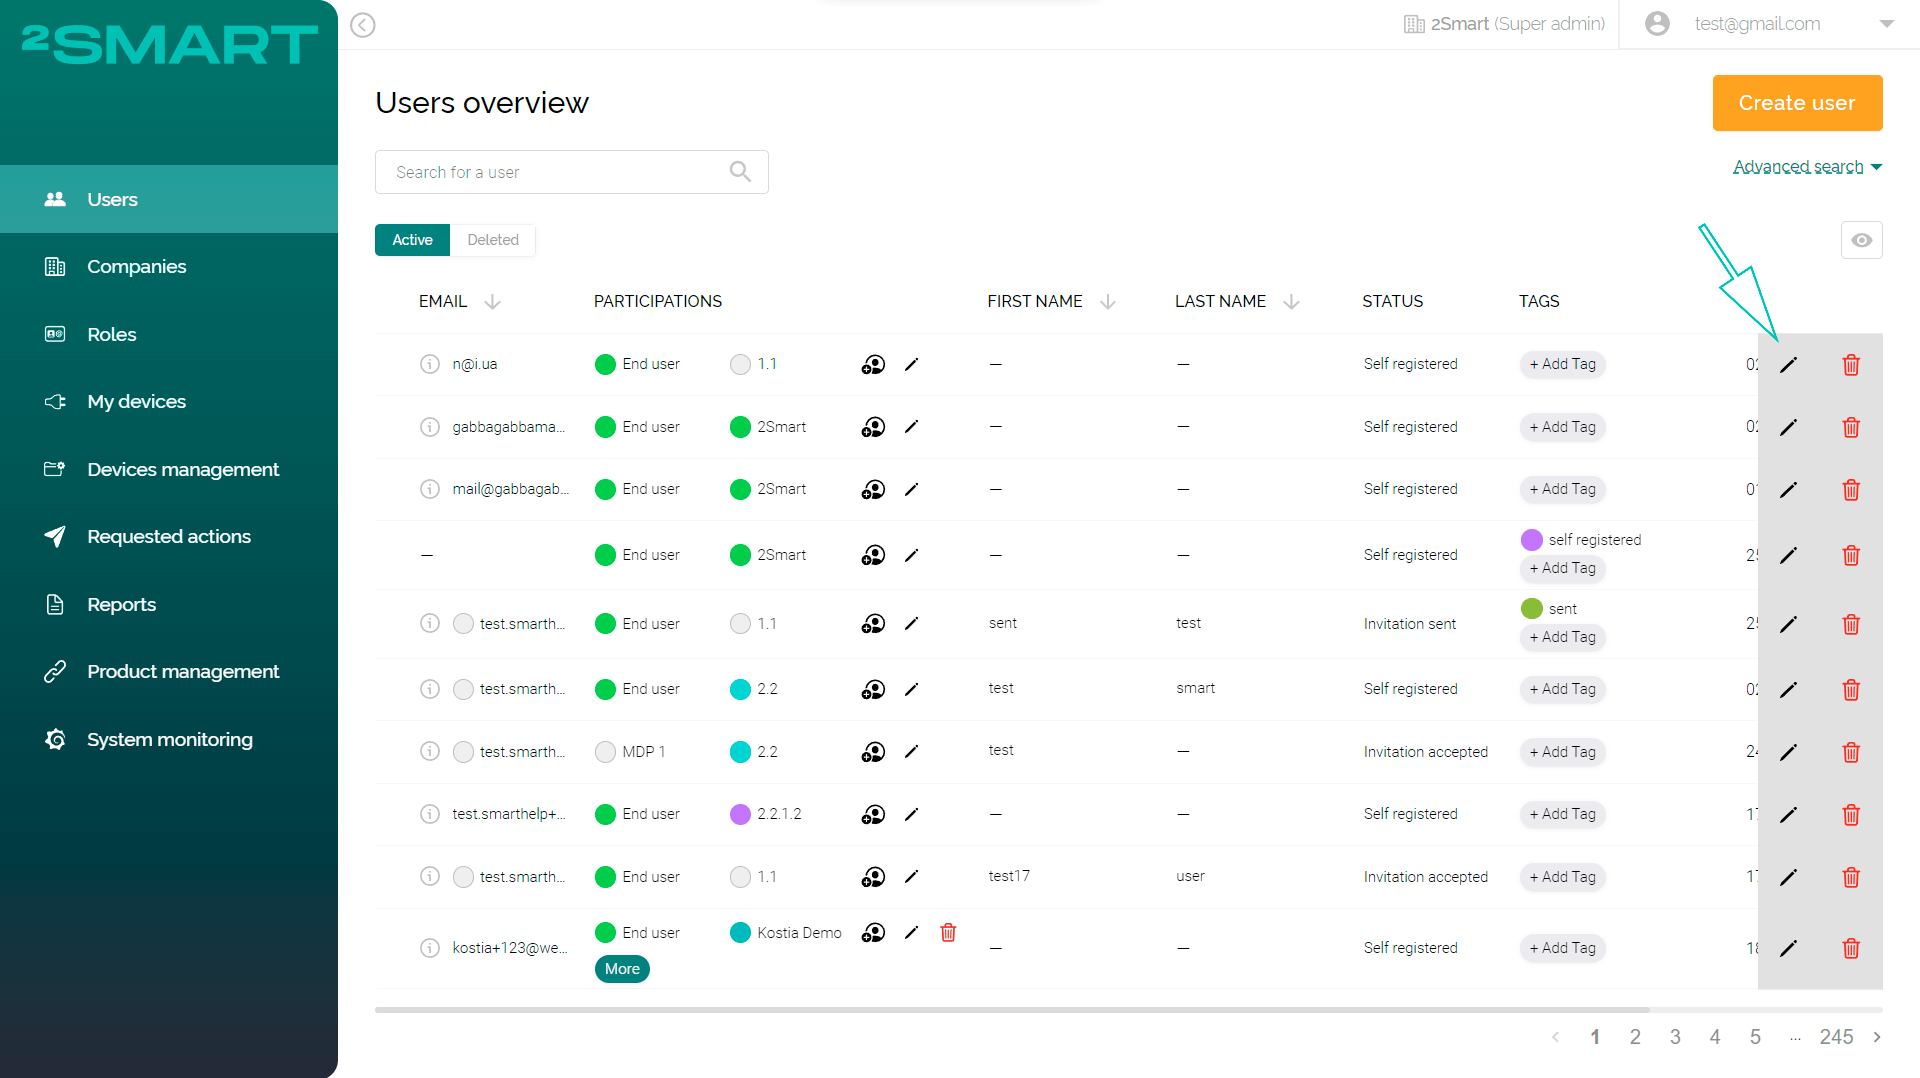
The table with existing Users is available in the workspace on the "Users" page. The table shows Users with the following Participations:
- Participation in the same Company as the administrator;
- Participation in subsidiaries concerning the administrator's Company.
Detailed description and example in the section: "Manage Companies and Users in a nested structure".
The table displays basic information about the Users:
- “E-mail” address;
- “Participations” in the current Company and other Companies (if any);
- “First name” and “Last name”;
- “Status” of the User;
- “Tags” assigned to the User;
- Date and time of “editing” and “creation”.
The User table headers allow sorting the list of Users quickly.
The User can use the "View" button to select which table columns will be shown.
The User status field helps determine their origin. There are the following User statuses:
- “Invitation sent” - Users who have been sent an invitation but who have not login with credentials sent to the email;
- “Invitation accepted” - Users who have received an invitation and login with credentials from the email;
- “Self Registered” - Users who have registered themselves
Creating and inviting new Users
The administrator with the appropriate permissions can independently add new Users to the system. The administrator can grant access to a new User without waiting for their registration. To do this, click the "Create User" button on the "Users" page.
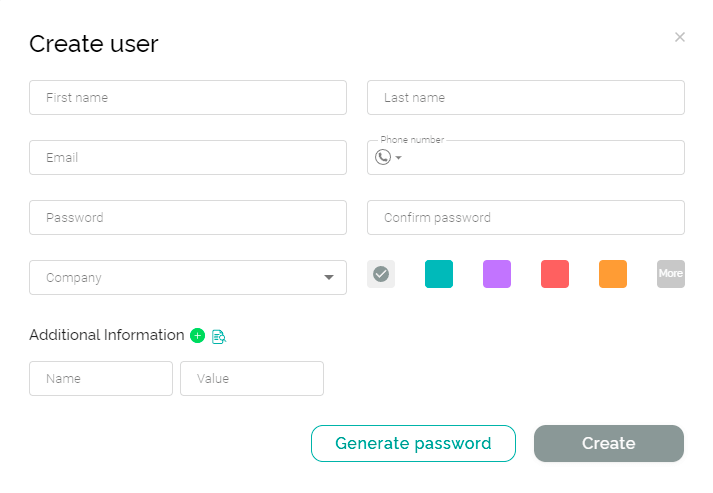
In the appeared modal window “Сreate User”, the administrator can fill in the required fields:
- "First name" and "Last name";
- "Email"* and "Phone number";
- "Password" and "Confirm password";
- "Company";
- Color selection (Additional description in the section “Entity color selection”);
- “Additional information” (Additional description in the section “Entering additional information”).
Fields marked with "*" ("First Name", "Last Name", "Email", "Password", and "Confirm password") are mandatory.
To generate a random User password, use the "Generate password" button.
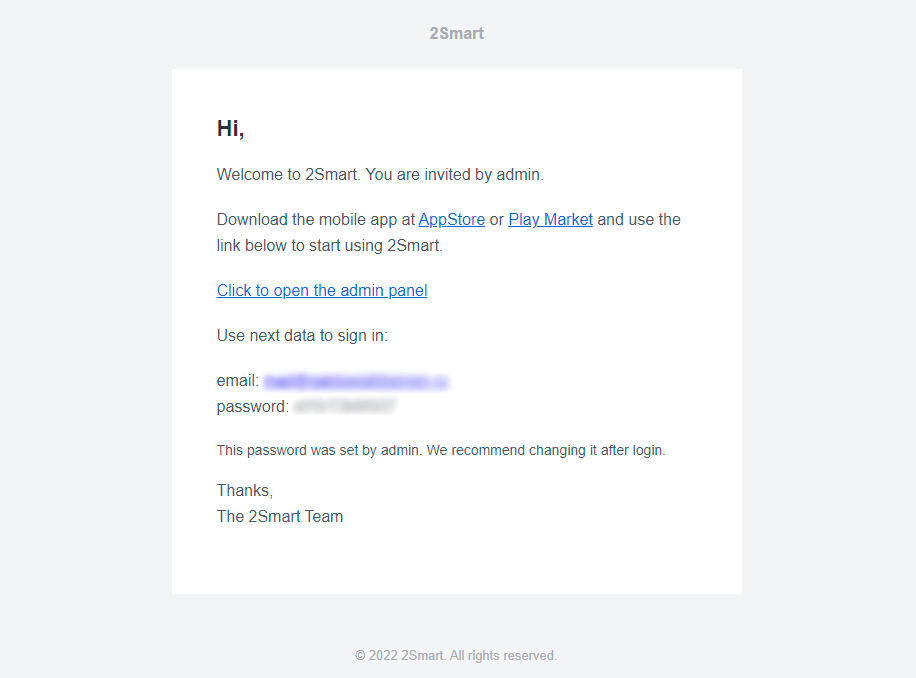
After filling in all the fields, the administrator must click the "Create" button. The created User will be displayed in the general table of Users. An invitation with a Username and password for logging into the platform will be sent to their email.
Company for User
When creating a User, the administrator can select the Company to which the created User should be added.
- An administrator can add a User to their own Company or subsidiaries.
- An administrator cannot add a User to a parent Company.
Detailed description and example in the section: "Manage Companies and Users in a nested structure".
If the administrator does not manually assign a Company to a User, the User will automatically be added to the same Company as the administrator.
When a User is created, it is automatically assigned the End user Role in the specified Company. The corresponding Participation appears in the User's properties in the table on the Users page.
An administrator with the appropriate permissions can change the User's Role and Company on the "Users" page in the "Participations" column.
Participations
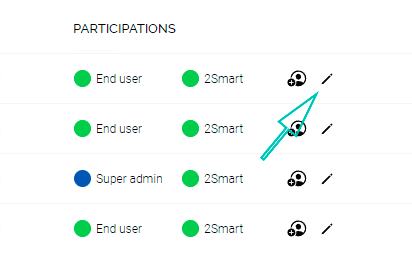
The relationship between the User and the Company is shown in the "Participations" column. Administrators with the appropriate permissions can manage Participations.
- If the User has a Role that excludes permissions "Manage User's Participation" and "Delete User's Participation", the "Participations" column info will not be available to them.

Description of the entity on the platform in the section: "Participations”.
Creating Participations
The administrator with the appropriate permissions can independently create Participations for Users. To do this, click the "Add Participation" icon on the "Participations" column.

In the modal window "Create Participation" that appears, the administrator can set the necessary relationships. To do this, select the required values from the drop-down lists:
- "Company name" - a field that displays the User's Company and its subsidiaries;
- "Role" – the field indicates all global Roles;
- "User" – a non-modifiable field with information about the User for whom the Participation is being created.
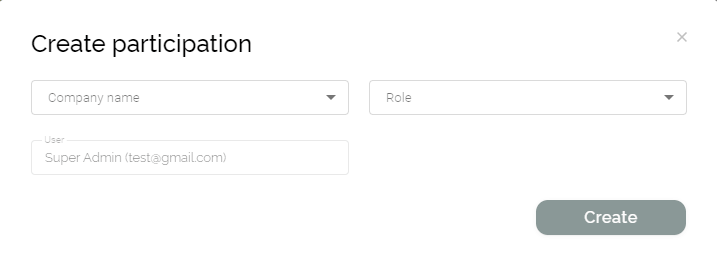
To quickly find the desired value in the field, start typing the name.
After filling in all fields, the administrator must click the "Create" button. The created Participation for the User will be displayed in the "Participations" column.
Editing Participations
The administrator with the appropriate permissions can edit the existing Users' Participations. To do this, click the "Edit Participation" pencil icon on the "Participations" column.
In the modal window "Edit Participation" that appears, the administrator makes the necessary changes to the Participation for the User. To do this, select the required values from the drop-down lists "Company name" and "Role". After editing the Participation, click the "Update" button.
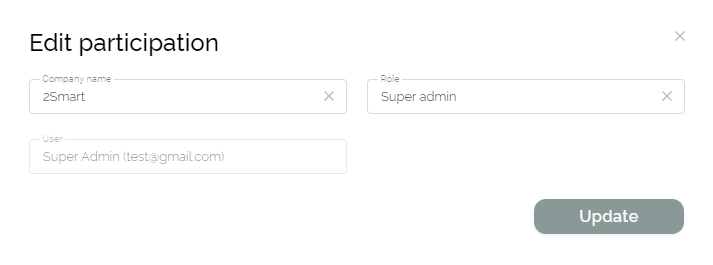
The User can't edit their own Company, Role, or User without "Super Admin" confirmation. Detailed description in the section: "Request system”.
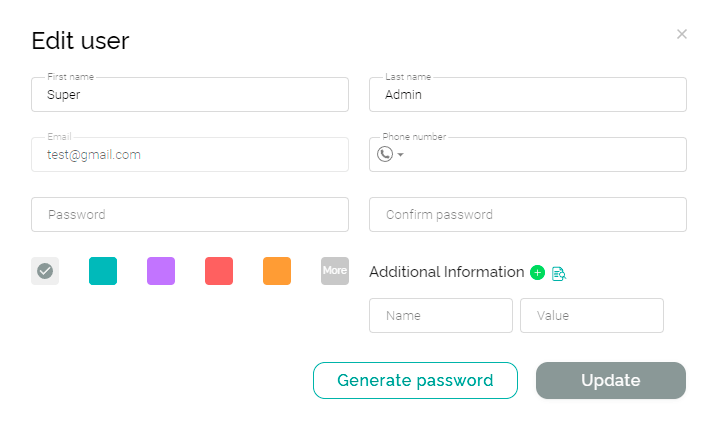
Editing Users
The administrator with the appropriate permissions can edit the existing Users via the table on the "Users" page. To do this, select the required User and click the pencil icon "Edit".
In the appeared modal window "Edit User", the administrator can modify the required fields. After editing the User, click the "Update" button.